docker-tutorial
devops-tutorial/docker-tutorial
/////////////////////////////////////////////////
Most of us, especially developers and administrators working in the software industry, must be familiar with the term Docker. Docker has become a standard in the IT industry when it comes to packaging, deploying, and running distributed applications with ease. Today, we will be learning about Docker end to end.
/////////////////////////////////////////////////
The aim of this Docker tutorial is to make you learn about Docker basics. Additionally, we will dive into more concepts such as virtualization, containerization, need for Docker, Docker architecture, Docker installation, Docker images, and so on.
Here is the list of topics included in this best Docker Tutorial:
- Introduction to Docker
- Docker Architecture
- Getting Started
- Typical Workflow
- Docker Commands
- Dockerfile
- Docker Machine
- Conclusion
Let us learn Docker from scratch!
What is Docker?
Docker simplifies the DevOps Methodology by allowing developers to create templates called “images,” using which we can create lightweight virtual machines called “containers.” Docker makes things easier for software developers by giving them the capability to automate infrastructure, isolate applications, maintain consistency, and improve resource utilization. There might arise a question that such tasks can also be done through virtualization, then why choose Docker over it. It is because virtualization is not as efficient.
Why? We shall discuss this as we move along in this Docker Tutorial.
To begin with, let us understand, what is virtualization?
What is virtualization?

Virtualization refers to importing a guest operating system on the host operating system and allowing developers to run multiple OS on different VMs while all of them run on the same host, thereby eliminating the need to provide extra hardware resources.
These virtual machines are being used in the industry in many ways:
- Enabling multiple operating systems on the same machine
- Cheaper than the previous methods due to less or compact infrastructure setup
- Easy to recover and do maintenance if there is any failure
- Faster provisioning of applications and resources required for tasks
- Increase in IT productivity, efficiency, and responsiveness
Let us check out the working of VMs with the architecture and also understand the issues faced by them.
What is a virtualization host?
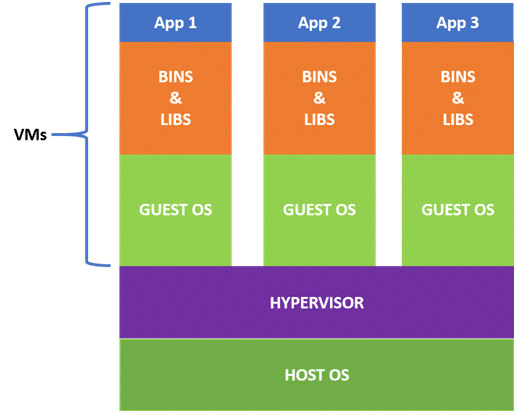
From the above VM architecture, it is easy to figure out that the three guest operating systems acting as virtual machines are running on a host operating system. In virtualization, the process of manually reconfiguring hardware and firmware and installing a new OS can be entirely automated; all these steps get stored as data in any files of a disk.
Virtualization lets us run our applications on fewer physical servers. In virtualization, each application and OS live in a separate software container called VM. Where VMs are completely isolated, all computing resources, such as CPUs, storage, and networking, are pooled together, and they are delivered dynamically to each VM by a software called hypervisor.
However, running multiple VMs over the same host leads to degradation in performance. As guest OSs have their own kernel, libraries, and many dependencies running on a single host OS, it takes a large occupation of resources such as processor, hard disk, and, especially, RAM.
Also, when we use VMs in virtualization, the bootup process takes a long time that affects efficiency in the case of real-time applications. In order to overcome such limitations, containerization was introduced.
How did containerization overcome these issues? Let us discuss this further in this basic Docker Tutorial.
In the next section of this step-by-step Docker tutorial, let us understand what exactly is containerization.
What is containerization?
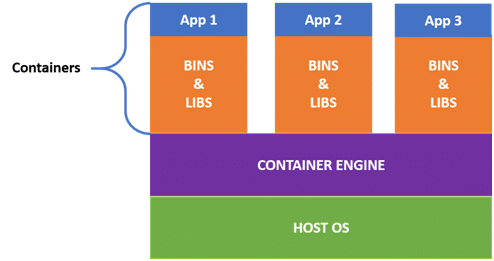
Containerization is a technique where virtualization is brought to the level of an OS. In containerization, we virtualize OS resources. It is more efficient as there is no guest OS consuming host resources. Instead, containers utilize only the host OS and share relevant libraries and resources, only when required. The required binaries and libraries of containers run on the host kernel leading to faster processing and execution.
In a nutshell, containerization (containers) is a lightweight virtualization technology acting as an alternative to hypervisor virtualization. Bundle any application in a container and run it without thinking of dependencies, libraries, and binaries!
Now, let us look into its advantages:
- Containers are small and lightweight as they share the same OS kernel.
- They do not take much time, only seconds, to boot up.
- They exhibit high performance with low resource utilization.
Now, let us understand the difference between containerization and virtualization in this Docker container tutorial.
Containerization vs virtualization
As we have been introduced to containerization and virtualization, we know that both let us run multiple OSs on a host machine.
Now, what are the differences between containerization and virtualization? Let us check out the below table to understand the differences.
| Virtualization | Containerization |
| Virtualizes hardware resources | Virtualizes only OS resources |
| Requires the complete OS installation for every VM | Installs the container only on a host OS |
| A kernel is installed for every virtualized OS | Uses only the kernel of the underlying host OS |
| Heavyweight | Lightweight |
| Limited performance | Native performance |
| Fully isolated | Process-level isolation |
In the case of containerization, all containers share the same host OS. Multiple containers get created for every type of application making them faster but without wasting the resources, unlike virtualization where a kernel is required for every OS and lots of resources from the host OS are utilized.
We can easily figure out the difference from the architecture of containers given below:
In order to create and run containers on our host OS, we require software that enables us to do so. This is where Docker comes into the picture!
Now, in this tutorial, let us understand the Docker architecture.
Docker Architecture
Docker uses a client-server architecture. The Docker client consists of Docker build, Docker pull, and Docker run. The client approaches the Docker daemon that further helps in building, running, and distributing Docker containers. Docker client and Docker daemon can be operated on the same system; otherwise, we can connect the Docker client to the remote Docker daemon. Both communicate with each other by using the REST API, over UNIX sockets or a network.
The basic architecture in Docker consists of three parts:
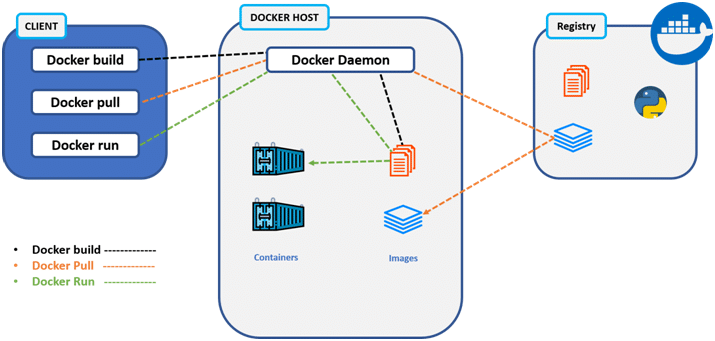
- Docker Client
- Docker Host
- Docker Registry
Docker Client
- It is the primary way for many Docker users to interact with Docker.
- It uses command-line utility or other tools that use Docker API to communicate with the Docker daemon.
- A Docker client can communicate with more than one Docker daemon.
Docker Host
In Docker host, we have a Docker daemon and Docker objects such as containers and images. First, let us understand the objects on the Docker host, then we will proceed toward the functioning of the Docker daemon.
- Docker objects:
- What is a Docker image? A Docker image is a type of recipe or template that can be used for creating Docker containers. It includes steps for creating the necessary software.
- What is a Docker container? A type of virtual machine that is created from the instructions found within the Docker image. It is a running instance of a Docker image that consists of the entire package required to run an application.
- Docker daemon:
- Docker daemon helps in listening requests for the Docker API and in managing Docker objects such as images, containers, volumes, etc. Daemon issues to build an image based on a user’s input, and then saves it in the registry.
- In case we do not want to create an image, then we can simply pull an image from the Docker hub, which might be built by some other user. In case we want to create a running instance of our Docker image, then we need to issue a run command that would create a Docker container.
- A Docker daemon can communicate with other daemons to manage Docker services
Docker Registry
- Docker registry is a repository for Docker images that are used for creating Docker containers.
- We can use a local or private registry or the Docker hub, which is the most popular social example of a Docker repository.
Now that we are through the Docker architecture and understand how Docker works, let us get started with the installation and workflow of Docker and implement important Docker commands.
Installing Docker
For installing Docker on Windows and macOS, the process is quite simple. All we have to do is download and install Docker from Download Docker, which includes Docker client, Docker machine, Compose (Mac only), Kitematic, and VirtualBox.
On the other hand, in the case of Linux, there are several steps that we need to follow. Let us check them out.
To install Docker on the Ubuntu box, first, we need to update its packages. To do so, type the below command in the terminal:
sudo apt-get update
As we are using this command on sudo, after we hit Enter, it will ask for a password. Provide the password and then follow the steps given further in this Docker tutorial.
Now, we must install its recommended packages. For that, just type the below-mentioned command:
sudo apt-get install linux-image-extra-$(uname -r) linux-image-extra-virtual
Now, we have successfully installed the prerequisites for Docker. Press “y” to continue further.
sudo apt-get install docker- engine
Let us move forward in this docker tutorial and install the Docker engine.
The Docker installation process is complete now. Use the below-mentioned command to verify if Docker is installed correctly.
sudo service docker start
You will get an output as start: Job is already running: docker
This means that Docker has been started successfully.
Running a Container
After the installation of Docker, we should be able to run the containers. If we do not have a container to run, then Docker will download the image in order to build the container from the Docker hub and then will build and run it.
We can run a simple “hello-world” container to cross-check if everything is working properly. For that, run the below-mentioned command:
docker run hello-world
Output:
Hello from Docker!
This message shows that the installation appears to be working correctly.
Now, let us move forward in this Docker tutorial to understand the Docker workflow.
Typical Local Workflow
Docker’s typical local workflow allows users to create images, pull images, publish images, and run containers.
Let us understand this typical local workflow from the diagram below:
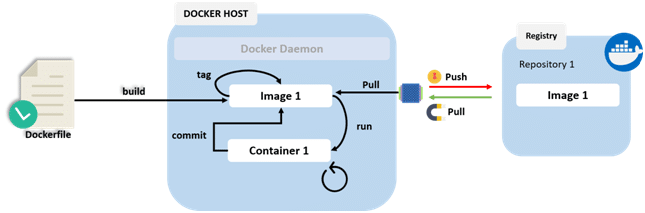
Dockerfile, here, consists of the configuration and the name of the image pulled from a Docker registry such as a Docker hub. This file basically helps in building an image from it, which includes the instructions about container configuration, or it can be image pulling from a Docker registry.
Let us understand this process in a little detailed way:
- It basically involves building an image from a Dockerfile that consists of instructions about container configuration or image pulling from a Docker registry.
- When this image is built in our Docker environment, then we should be able to run the image, which, further, creates a container.
- In our container, we can do any operations such as:
- Stopping the container
- Starting the container
- Restarting the container
- These runnable containers can be started, stopped, or restarted just like how we operate a virtual machine or a computer.
- Whatever manual changes, such as configurations or software installations, are made, these changes in a container can be committed to making a new image, which can, further, be used for creating a container from it later.
- At last, when we want to share our image with our team or the world, we can easily push our image into the Docker registry.
- One can easily pull this image from the Docker registry using the pull command.
Pulling an Image from the Docker Registry
The easiest way to obtain an image, to build a container from, is to find an already prepared image from Docker’s official website.
We can choose from various common software, such as MySQL, Node.js, Java, Nginx, or WordPress, on the Docker hub as well as from the hundreds of open-source images made by common people around the globe.
For example, if we want to download the image for MySQL, then we can use the pull command:
docker pull mysql
In case we want the exact version of the image, then we can use:
docker pull mysql:5.5.45
Output:
REPOSITORY TAG IMAGE VIRTUAL SIZE<none> <none> 4b9b8b27fb42 214.4 MB mysql 5.5.45 0da0b10c6fd8 213.5 MB
When we run this command, we can observe the created image with the repository name <none>.
Now, to add the identity of the repository, we can use the following command:
docker build –t test-intellipaat .
After -t, we can add any name of our choice to identify our repository.
Output:
REPOSITORY TAG IMAGE ID VIRTUAL SIZEtest-intellipaat  latest 4b9b8b27fb42   214.4 MB
mysql  5.5.45  0da0b10c6fd8   213.5 MB
Now, in this Docker Tutorial, we shall customize an image manually by installing software or by changing configurations. After completion, we can run the Docker commit command to create an image of the running container.
Running an Image
In order to run a Docker image, all we need to do is use the run command followed by our local image name or the one we retrieved from the Docker hub.
Usually, a Docker image requires some added environment variables, which can be specified with the -e option. For long-running processes, such as daemons, we also need to use the -d option.
To start the “test-intellipaat” image, we need to run the command shown below, which configures the MySQL root user’s password as documented in the Docker hub MySQL repository’s documentation:
docker run -e MYSQL_ROOT_PASSWORD=root+1 –d test-intellipaat
To check the container running, use the command below:
docker ps
This command lists all of our running processes, images, the name they are created from, the command that is run, ports that software are listening on, and the name of the container.
CONTAINER ID IMAGE COMMAND30645F307114 test-intellipaat “/entrypoint.sh mysql”PORTS NAMES
3306/tcp  shubham_rana
We can figure out, from the above output, that the name of the container is shubham_rana, which is an auto-generated one.
When we want to explicitly name the container, the best practice is to use the –name option that inserts the name of our choice at the container startup:
docker run –name intellipaat-sql -e MYSQL_ROOT_PASSWORD=root+1 -d est-mysql
We can easily name our container with this command.
Stopping and Starting Containers
Once we have our Docker container up and running, we can use it by typing the docker stop command with the container name as shown below:
docker stop intellipaat-sql
In case we want to run our container again from the state in which we shut it down, we can use the start command as our entire container is written on a disk:
docker start intellipaat-sql
Now, let us see how we can tag an image.
Tagging an Image
Once we have our image up and running, we can tag it with a username, image name, and version number before we push it into the repository by using the docker tag command:
docker tag intellipaat-sql javajudd/est-mysql:1.0
Now, in this Docker Tutorial, let us see how we can push an image into the repository.
Pushing an Image into the Repository
Now, we are ready to push our image into the Docker hub for anyone to use it via a private repository.
- First, go to https://hub.docker.com/ and create a free account
- Next, login to the account using the login command:
docker login
- Then, input the username, password, and email address that we are registered with
- Finally, push our image, with our username, image, and version name, by using the push command
Within a few minutes, we will receive a message about our repository stating that our repository has been successfully pushed.
When we go back to our Docker hub account, we will see that there is a new repository as shown below:
Docker Commands
Listing Containers
We have already seen, in this Docker tutorial, how to list the running containers using the ps command, but now what we want is to list all the containers, regardless of their state. Well, to do that, all we have to do is add the -a option as shown below:
docker ps -a
Now, we can easily distinguish between which container we want to start with and which container we want to remove.
Removing Containers
After using a container, we would usually want to remove it rather than having it lying around consuming disk space.
We can use the rm command to remove a container as shown below:
docker rm intellipaat-sql
Removing Images
We already know how to list all the locally cached images by using the images command. These cached images can occupy a significant amount of space, so in order to free up some space by removing unwanted images, we can use the rmi command as shown below:
docker rmi intellipaat-sql
Now, we know how to remove cached images, but what about the unwanted and unnamed images that we may end up generating during the debugging cycle of creating a new image? These images are denoted with the name <none>. We can remove them all by using the following command:
docker rmi $(docker images -q -f dangling=true)
Listing Ports
Knowing which ports are exposed by a container beforehand makes our work a lot easier and faster, e.g., Port 3306 is for accessing a MySQL database and Port 80 is for accessing a web server. Using the port command, as shown below, we can display all exposed ports:
docker port intellipaat-sql
Listing Processes
To display processing in a container, we can use the top command in Docker, which is very similar to the top command in Linux.
docker top intellipaat-sql
Executing Commands
To execute commands in a running container, we can use the exec command.
For example, if we want to list the contents of the root of the hard drive, we can use the exec command as shown below:
docker exec intellipaat-sql ls /
We can gain access to the bash shell if we wish to ssh as root into the container. To do so, we can use the following command:
docker exec -it my-est-mysql bash
Note: All communications between Docker clients and Docker daemons are secure since they are already encrypted.
Running Containers
The run command is one of the most complicated commands of all the Docker commands. By using this command, we can perform various tasks such as configuring security and managing network settings and system resources such as memory, file systems, and CPU. We can visit the following link to see and understand how to do all of the above and more, by using the run command.
Dockerfile
A Dockerfile contains all the instructions, e.g., the Linux commands to install and configure the software. Dockerfile creation, as we already know, is the primary way of generating a Docker image. When we use the build command to create an image, it can refer to a Dockerfile available on our path or to a URL such as the GitHub repository.
Instructions:
The instructions in a Dockerfile are executed in the same order as they are found in the Dockerfile.
There can also be comments starting with the # character in the Dockerfile.
The following table contains the list of instructions available:
| Instruction | Description |
| FROM | The first instruction in the Dockerfile, it identifies an image to inherit from |
| MAINTAINER | This instruction provides visibility as well as credit to the author of the image |
| RUN | This instruction executes a Linux command to install and configure |
| ENTRYPOINT | The final script or application which is used to bootstrap the container and make it an executable application |
| CMD | This instruction uses a JSON array to provide default arguments to the ENTRYPOINT |
| LABEL | This instruction contains the name/value metadata about the image |
| ENV | This instruction sets the environment variables |
| COPY | This instruction copies files into the container |
| ADD | This instruction is basically an alternative to the COPY instruction |
| WORKDIR | This sets a working directory for RUN, CMD, ENTRYPOINT, COPY, and/or ADD instructions |
| EXPOSE | The ports on which the container listens |
| VOLUME | This instruction is to create a mount point |
| USER | An instruction to run RUN, CMD, and/or ENTRYPOINT instructions |
Docker Machine
Docker machine is a command-line utility that is used to manage one or more local machines, which are usually run in separate VirtualBox instances, or remote machines that are hosted on Cloud providers, e.g., Amazon Web Services, Microsoft Azure, etc.
How to create a Local Machine?
Docker Toolbox comes with a default Docker machine named default. This is just to give us a taste of it and to get us started with, but we may need multiple machines later on to segment the different containers that are running. To do that, we can use the following command:
docker-machine create –d virtualbox intellipaat
This command will create a local machine by using a VirtualBox image named intellipaat.
Listing Machines
If we want to list the machines that we have configured, we can run the following command:
docker-machine ls
Starting and Stopping Machines
We can start the Docker machine that we have created by using the following command:
docker-machine start intellipaat
Now that the Docker machine has started, we will have to configure the Docker command line, with which the Docker daemon should interact. We can use the following commands to do this:
docker –machine env intellipaat
eval “$(docker-machine env intellipaat)”
Now, to stop a machine, use the following command:
docker-machine stop intellipaat
Note: These start and stop commands will start and stop our VirtualBox VMs, and we can watch the state of the VMs changing while we run the commands, if we have the VirtualBox manager open.
Happy learning! 😊
/////////////////////////////////////////////////
/////////////////////////////////////////////////
Docker Commands Cheat Sheet
Introduction
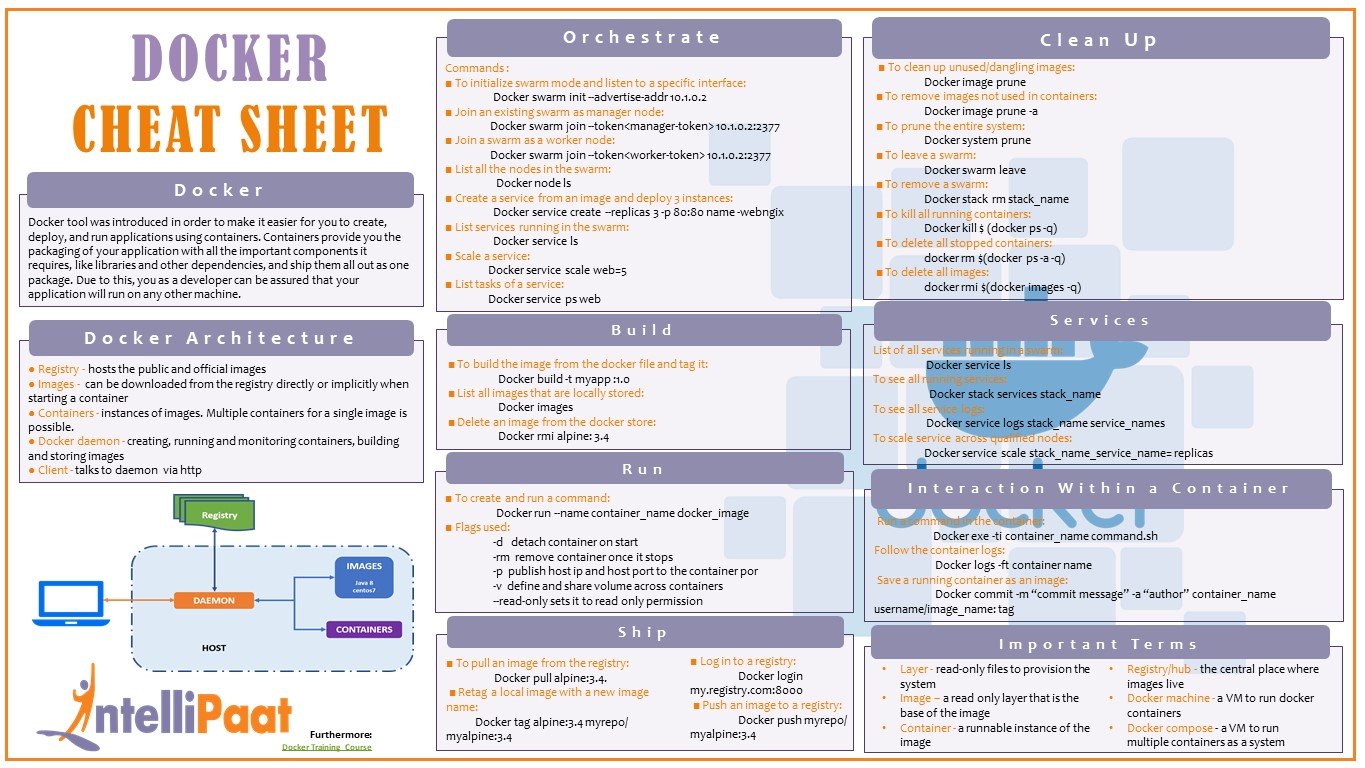
The Docker tool was introduced to make it easier for developers to create, deploy, and run applications using containers. Containers provision the developers with the packaging of their applications, together with all important components they require such as libraries and other dependencies, and shipping of them all out as a single package. This assures the developers that their applications can be run on any other machine.
We will start this tutorial by understanding the Docker architecture and the main aspects in it, and then we will continue with the important commands required for the Docker operations, such as Docker installation, build, push, run, ship, clean up, and the interaction with the container.
Docker Architecture
DevOps architecture consists of five main entities, namely, registry, image, container, daemon, and client.
- Registry: It hosts public and official images. The Docker registry that we use is Docker Hub.
- Image: It can be downloaded from the registry directly or implicitly when starting a container.
- Container: It is basically the instance of an image. Multiple containers can exist for a single image.
- Docker daemon: A daemon creates, runs, and monitors containers, along with building and storing images.
- Client: A client talks to Docker daemon via http.
Orchestrate
Orchestration is used for managing a container’s life cycle, especially in dynamic environments. It is used for controlling and automating many tasks for containers.
There are many Docker orchestration tools such as Docker Swarm, Kubernetes, etc. In this tutorial, we’re elucidating Docker Swarm commands. Let’s check out the commands used for Docker orchestration.
Commands
- To initialize the swarm mode and listen to a specific interface:
Docker swarm init --advertise-addr 10.1.0.2
- To join an existing swarm as a manager node:
Docker swarm join --token<manager-token> 10.1.0.2:2377
- To join a swarm as a worker node:
Docker swarm join --token<worker-token> 10.1.0.2:2377
- To list all nodes in the swarm:
Docker node ls
- To create a service from an image on the existing port and deploy three instances:
Docker service create --replicas 3 -p 80:80 name -webngix
- To list services running in a swarm:
Docker service ls
- To scale a service:
Docker service scale web=5
- To list the tasks of a service:
Docker service ps web
Build
The build command is used for building images from a Docker file. Let’s now check out some of the essential Docker build commands.
Commands
- To build an image from the Docker file and tag it:
Docker build -t myapp :1.0
- To list all the images that are locally stored:
Docker images
- To delete an image from the Docker Store:
Docker rmi alpine: 3.4
Run
The run command is used for creating a container from a specified image. Check out the below-listed run commands.
Commands
- To create and run a command:
Docker run --name container_name docker_image
Flags used:
- -d: To detach a container on start
- -rm: To remove a container once it stops
- -p: To publish the host IP and the host port to the container port
- -v: To define and share the volume across containers
- –read-only: To set to the read-only permission
Ship
Docker gives us the capability of shipping our application container anywhere, on any platform. Let’s check out some commands used for it.
Commands
- To pull an image from the registry:
Docker pull alpine:3.4
- To retag a local image with a new image name:
Docker tag alpine:3.4 myrepo/ myalpine:3.4
- To log in to the registry:
Docker login my.registry.com:8000
- To push an image to the registry:
Docker push myrepo/ myalpine:3.4
Clean up
To prevent wasting resources, we must know how to clean up. In this Docker cheat sheet tutorial, next, a few essential clean up commands are provided.
Commands
- To clean an unused/dangling image:
Docker image prune
- To remove an image that is not used in a container:
Docker image prune -a
- To prune the entire system:
Docker system prune
- To leave a swarm:
Docker swarm leave
- To remove a swarm:
Docker stack rm stack_name
- To kill all running containers:
Docker kill $ (docker ps -q)
- To delete all stopped containers:
docker rm $(docker ps -a -q)
- To delete all images:
docker rmi $(docker images -q)
Services
Let’s now take a sneak peek at the commands used to view the running services, to run the services, to view all service logs, and to scale the services.
Commands
To list all services running in a swarm:
Docker service ls
To see all running services:
Docker stack services stack_name
To see all service logs:
Docker service logs stack_name service_names
To scale a service across qualified nodes:
Docker service scale stack_name_service_name= replicas
Interaction with a Container
Let’s check out how to make an interaction with a container in Docker.
Commands
To run a command in a container:
Docker exe -ti container_name command.sh
To follow container logs:
Docker logs -ft container name
To save a running container as an image:
Docker commit -m “commit message” -a “author” container_name username/image_name: tag
Important Terms
Some of the important terms to know about while using Docker containers are listed below:
- Layer: Read-only files to provision the system
- Image: Read-only layer that is the base of an image
- Container: A runnable instance of the image
- Registry/hub: A central place where images reside
- Docker machine: A VM to run Docker containers
- Docker Compose: A VM to run multiple containers as a system
/////////////////////////////////////////////////
/////////////////////////////////////////////////
/////////////////////////////////////////////////
/////////////////////////////////////////////////
/////////////////////////////////////////////////
/////////////////////////////////////////////////
/////////////////////////////////////////////////
/////////////////////////////////////////////////
/////////////////////////////////////////////////
/////////////////////////////////////////////////
/////////////////////////////////////////////////
/////////////////////////////////////////////////
/////////////////////////////////////////////////
/////////////////////////////////////////////////
/////////////////////////////////////////////////


Comments
Post a Comment